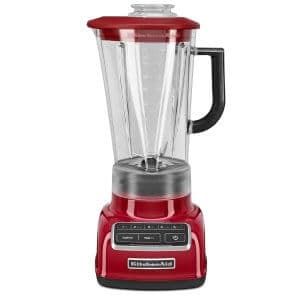
 Is your Kitchenaid blender leaking? One of the kitchen appliances that is most used in any kitchen is a blender. Blenders are versatile appliances that can be used to prepare any number of food items, including smoothies, juices, dips, sauces, and even soups.
A KitchenAid blender can be an essential kitchen appliance, but what do you do when it starts to leak? You could buy another one, or you could try to fix it with a simple solution.
There are some common causes of leaks in KitchenAid blenders that we will discuss below. Read on for 3 reasons why your KitchenAid blender might be leaking and how to fix it.
Read More: Kitchenaid Diamond Blender Review – Powerful 5-Speed Model
Reasons Why A KitchenAid Blender Leaks
There are several reasons why your KitchenAid blender may be leaking. Thankfully, most of them are easy fixes. Here are some of the main reasons why your KitchenAid blender might be leaking.
Cracked Base
The most common reason for a KitchenAid blender to leak is because the base of the unit has cracked. This usually occurs if something hard (such as ice cubes) gets caught in between the blades and serves as an obstacle while it spins, causing cracks to form on the surface of the base.
Lubrication Problems
Another reason why your KitchenAid blender might be leaking is that there isn’t enough lubricant in the machine’s gears or on its blades. This could happen if you make a lot of thick, frozen drinks and/or soups with it for an extended period of time without adding any additional liquid to help keep things moving along smoothly inside the appliance. If this happens, then you will need to add more lubricant so that everything works as intended again after use.
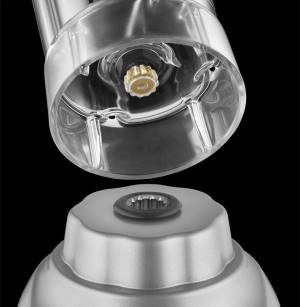
Damaged or Missing Gasket
In some cases, your Kitchen Aid blender may be leaking from around the gasket underneath where the jug sits onto the motor housing unit. In these situations, no amount of tightening can prevent leakage from happening when in use.
You will need to replace the gasket in order for everything to function properly again so that it can prevent any future leaks from occurring during operation.
The Gasket is Upside Down
Another simple reason why your KitchenAid blender might be leaking is that the gasket is installed upside down. A gasket that is installed incorrectly may cause leaks.
The gasket is ridged, and the flat side should be facing down. if you experience leaking while blending, check the gasket is the correct way around.
The Jar is not Fully Seated in the Base
In some cases, the jar is not seated fully in the base. If this happens, a seal can’t be created between your blender’s blades and the bottom of its jug. This could cause leaks to occur during use if it isn’t dealt with properly right away.
You will need to make sure that you are pushing down on each corner of the blending unit until they click into place for proper sealing action when blending anything together so that no leaks appear while using your appliance.
Read More: Why is my Ninja Blender Leaking? 5 Causes and Fixes
How to Fix a Leaking KitchenAid Blender
 Depending on what is causing your KitchenAid blender to leak, you may be able to fix the problem simply by taking out and replacing the gasket underneath where the jar sits onto its base.
The gasket will most likely be the culprit of a leaking KitchenAid blender. Whether the gasket is missing, damaged, or installed wrongfully, a replacement should stop leaks in their tracks.
Installing a New Gasket onto your KitchenAid Blender
Unplug the unit from its power source. Remove the pitcher from its base by pulling it up and out of place with both hands while supporting it from underneath so that you can keep everything together as one piece when taking it apart for maintenance purposes.
Locate the rubber gasket at the bottom of where your jar sits over its motor housing unit on top of your appliance’s base. Take off any old or broken pieces that may be present using a blunt knife if necessary before replacing them with a new one to prevent leaks.
Clean away dirt, dust, and debris from the base of your blender before setting a new gasket into place on top of it.
Make sure that you have all pieces in their proper place without making any mistakes when putting things back together again so that no leaks happen while using this appliance going forward.
Reattach the pitcher by placing its bottom edge onto the motor housing unit until you hear a click signifying that everything has been locked back into its original position once again successfully.
Plug your KitchenAid blender into an electrical socket and proceed to use it normally.
What to do if the KitchenAid Blender is Still Leaking
If you have installed a new gasket and the blender is still leaking from around the bottom of its jar while in use, then you might need to replace both it and the blade assembly underneath where the gasket sits.
The best thing to do is hold the container over the sink and fill it with water. this will allow you to see exactly where the leak is coming from to make a decision about how best to proceed with the next steps.
If the KitchenAid container is cracked or broken, then it will need to be replaced immediately. If the leak is caused by a crack in the jar and there doesn’t appear to be any other problems with its gasket or blade assembly underneath, you can order a new jar online to replace it.
Take a look at the bottom of the blade assembly underneath where your gasket sits over its motor housing unit carefully, and make sure that there are no cracks present in this piece before replacing it if necessary. If you see any signs of damage here, then order a replacement part immediately too to stop leaks from happening while using your blender once again successfully.
If the cause of leaking cannot be determined after inspecting all parts for cracks and damage, you need the help of a professional to take a look at the appliance and make sure that everything is in working order.
If your KitchenAid blender is still in warranty, you can contact customer service for advice on what to do next.
Read More: Is Your NutriBullet Leaking? 7 Causes & Easy Fixes
KitchenAid Blender Leaking – Final Thoughts
KitchenAid blenders are an essential appliance in any kitchen, but they can start to leak. There are some common leaks that occur with all Kitchenaid models and it’s important for you to know how to fix them before the issue gets worse or damages other parts of your blender.
I hope this article has been helpful and that you now know how to fix a leaking KitchenAid blender. These tips should work for all KitchenAid blender models, so if you have an older version of the appliance that is still in good condition, then feel free to give this a try. Thanks for reading and good luck.